
Following on from my previous post about starting out in sports photography, I thought I’d put something together about what I’ve learnt around shooting football matches. When I first started planning out a post on this, I wasn’t going to make it a tutorial (I’m still learning, so no master!) but as I’m writing this it’s apparent it is. So, this will be my take on how I shoot football games, and please comment/message me if you have any other tips or think I could do something better. One of my original aims for this post was that I could provide a sort of reference set, locations and focal lengths with example images to try to help people know what to expect depending on their lens availability and or location flexibility. Note – I’ve also included a video part to this tutorial so you can see what it looks like from where I’m sitting during the game (link to video). In the future I’d like to expand this to some other sports, so let me know if you have found this useful and I will try to make that happen, but for now I’ll start with football.
The first to mention is that this is all about amateur football, the principles I’m sure are similar to shooting professional football, but with with amateur football it’s easier to locate yourself closer to the action and exactly where you want to (see my previous post on my thoughts about amateur sports photography).
To get the gear bit out of the way, In my experience I’ve had successful images with a focal length as short as 50mm, and what photographer can’t cover that focal length! But typically longer focal lengths do yield a higher percentage of keeper images. Looking back through most of my images 200-400mm seems to have the best success, although most games I do use the 50-140 for a bit, and as you can see below I have an example of 140mm from the sideline (Figure 3). In all the example images below the photos are shown with no crops, with a little cropping (not an issue with most cameras now) you can get success with a given focal length further than the examples I’ve shared. Most people are going to have up to at least 200mm, so should be able to cover a reasonable amount of the pitch, and if you have the 100-400 then that’s pretty much the whole pitch covered to some degree. Another gear difference to pro sports photography is that you’ll see pros shoot with 2 bodies, this makes it very easy to say you need a 400mm prime, but with only 400mm you’d actually miss a lot of good shots. With only 1 body, something shorter will be more versatile. Of course in an ideal world a long prime and a 70-200 equivalent would be great, but that’s not accessible to everyone.
These next gear items are worth talking about as they are just as important to your enjoyment as well;
- Warm kit – Cold is miserable!
- Dry kit – For both you and your equipment, as well, here in the UK you can have 4 seasons in a game
- Hot drink
- Small stool – Not only does this get you at the right height for better shots, but I use a swivel stool which makes tracking the game easier on the back
- Monopod – if you have a lens with any weight at all
- Batteries and cards – Kind of goes without saying, but you will need spares
Once you’ve got all the gear together, getting ready for the game means getting there a bit before it starts (if possible). Usual sports type settings apply, continuous focus, fast shutter (1/1000 or faster), widest aperture and fastest frames per second shooting. For most photography I shoot raw, but typically I shoot JPEG for football. One of the main reasons is now with an EVF I can get a direct view of exposure and white balance, so if it shifts at all (amateur sports, so not constantly lit stadiums!), and it will, then I can adjust on the fly. If you’re early enough you can use the warm ups to dial in your settings and get some practice in before the game starts.
Once you’ve got everything set, and the teams are warmed up, it’s time to get in position, Figure 1 below shows the 3 locations I will typically find myself at most games. One of the main reasons for these locations is having the team I’m there to shoot coming towards me, which means faces not backs when they have the ball. This may seem obvious, but it’s easy to forget when starting out. Now, I have got some keepers breaking that rule, but that’s more the exception than the rule. Another reason is avoiding the linesman, not only do you not want them to be in the way of your shots but more importantly a golden rule is to make sure you’re never in anyone’s way. Lastly, the mixture of sideline/goal line means that you’ll get different players at the optimal focal lengths throughout the game. I always try to make sure I get at least a few decent shots of every player, not only does this make it better for the players, but also means you try to capture certain types of shot, which can make you think a bit more. And remember, in amateur sports it’s about the fun/experience for everyone, people are giving up time to something they enjoy, and I always feel if I can help make that even more enjoyable then why not.
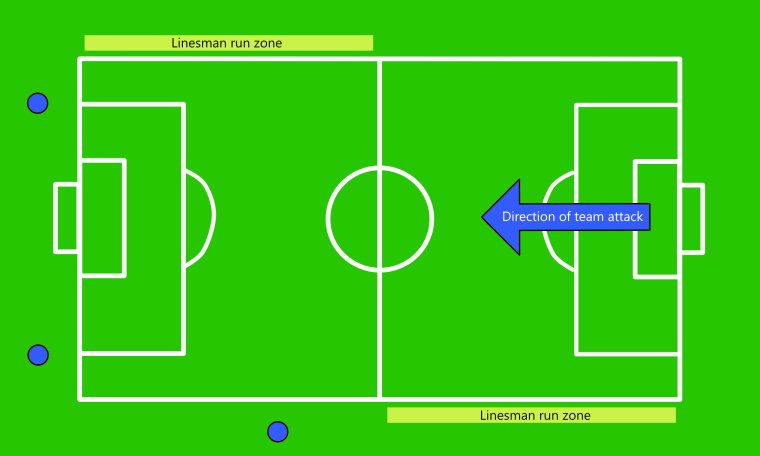
Figure 1. Typical locations to sit (blue dots)
On the topic of enjoyment, don’t bin the ‘bloopers’, when I first started sharing some photos of local matches I was deleting some of the pictures that weren’t ‘serious’ sports photography. Turns out that was a mistake, some of the pictures teams might find the most entertaining are what you might consider missed shots. Now obviously I’m not taking out of focus or other technically failed shots, but you’ll know them when you see them. Again, something that should be obvious, but might not be, don’t share those bloopers, just send them into the team with the others and if they want to share them, they will. That’s a quick way to find yourself unpopular if you share something people might not like.
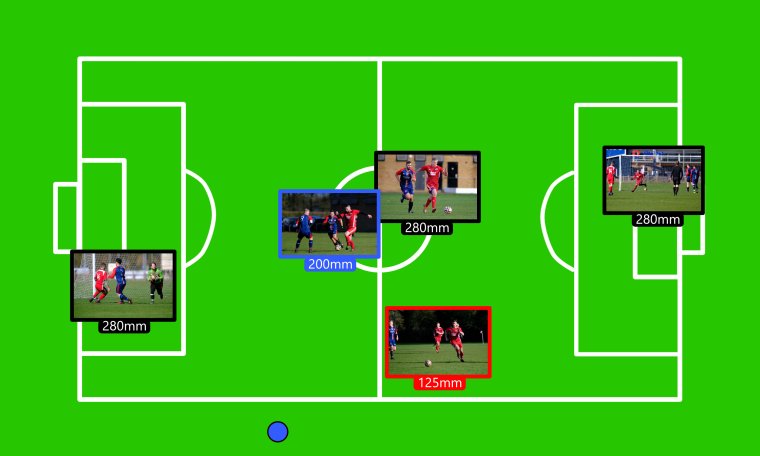
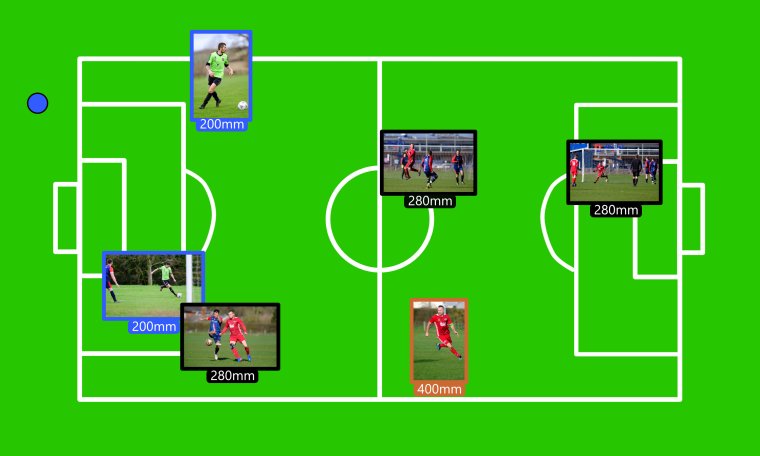
Lastly, moving onto the examples, below in figures 2 and 3 you can see example uncropped shots from the different locations and their focal lengths. These cover a range of 120mm to 400mm, so quite broad and also vary from tight isolated single players to wider action shots. It’s important to try out a few different things, including locations to see what works for you. One thing to keep in mind, is as mentioned earlier, never get in the way, and that extends to being a distraction. I will move location during a game if I feel I want to, sometimes it’s for a cleaner background, sometimes just to get other players, but I always try and do it discretely, during breaks in play or when they’re up the other end of the pitch.
So hopefully that helps provide an idea of how to approach football if you’re starting out in sports photography or looking to try something new. As always, your camera isn’t going to do anything sitting in a bag, so get out, give it a try and never feel like your gear should put you off trying (something I know can be a mental barrier with some genres like this). If this was helpful, please leave a like/comment and I can add more similar material.
