I recently posted an abstract photo of some raindrops with an umbrella showing through them (Instagram post below), and I had someone ask me how I did it and if I could share some of the details of behind the scenes, so I thought I’d do a write up of how I set out with the shot and some of the reasoning behind it.
The shot I ended up with was actually not really what I had in mind when starting to set this up, but often I find that’s the case. My original idea was to shoot directly from above, and have a wider angle revealing more of a field of droplets, possibly arranged with some loose theme. This was drawing some inspiration from Chema Madoz’s droplet puzzle image (Note: if you haven’t seen any of his work, it’s such a great mix of surrealism and ingenuity). Very quickly into the process of trying to capture the shot it was clear it wasn’t going to work as intended, but before I can explain why, I need to cover some of the more basics in the setup.
First thing about the setup is the fundamental component of the umbrella shape, which was generated using a piece of cardboard (cereal box in this case) carefully cut out in the umbrella shape. This was about 10cm across, so quite fiddly to do, however extra care is needed not just to avoid trimming a digit, but also because the nature of the shot being close and so much attention on the shape any mistakes would be obvious. One tip, is that cardboard can filed with a nail file to help get a clean edge and even out any less than perfect curves. This cutout was then placed onto a small pop-up diffuser panel sitting on the front of a reflector. What this did was firstly, separate the cutout from the light source by an appropriate amount, but there was also a few other benefits. The light spill from the flash was minimal, there’s no grid in the reflector, which might have reduced spill further, but would have been visible in the shot, hence not used (I did use a black background to help contain any spill and prevent unwanted reflections). Also it gave a clean white background for the shot, and one originally unintended feature was that it provided a clean transition from the light background to the dark surrounding the setup (more on that later).

You can see a bit more of the setup in my video of behind the shot here.
Once the lighting and modifiers were setup, I used a couple of clamps to secure a sheet of plexiglass about 25cm above the cutout. It’s always handy to have a sheet of transparent material for photography, either as a reflective surface to sit stuff on, or as transparent surface for placing things on. Glass is going to give a nicer finish as it’s less likely to pick up scratches, however the weight and storage can make it a bit more challenging to work with (the video covers the slight tweaks in post, of which removing those surface defects took the longest!). Before putting any water onto the surface, I did give this a spray of a car quick detailing product. What this does is it makes the surface much more hydrophobic, and so any water drops rise up and have a much better defined shape. The larger contact angle from the drop to the surface gives nice clean edges, and the addition of a circular polarizer also helps dial that in.
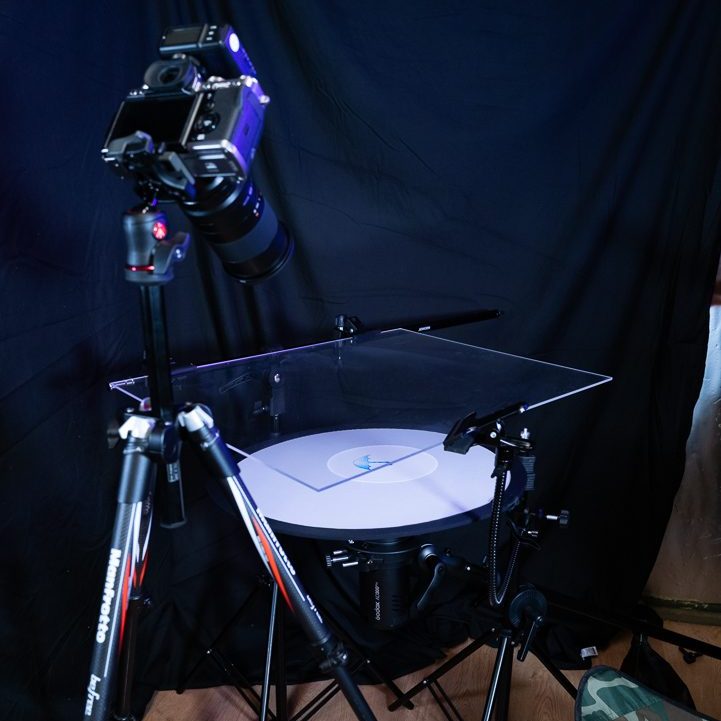
So now we have the lighting and surface, I added the droplets carefully. At first, these we just randomly place to start working on focus etc, and it was at this point, with the camera shooting straight down from above I realised that my original idea wasn’t going to work. Rather than a field of droplets on a uniform white background, the silhouette of the umbrella was showing through in the background making it very uneven. Enough that it was distracting, but not enough to use it like in the final shot. I did have a think about how I could have remedied this, moving the light source lower would have helped, but it would also then have needed to be larger with a larger umbrella cutout. Whilst achievable, it would have made the setup impractical for the space I was in. Also, the focal point for the refracted umbrella and the droplets were not well aligned, so one or the other was out of focus. Focus stacking was an option, but it didn’t feel like I’d end up with something anyway, and I almost abandoned the idea entirely at this point, but instead I tried to change things up a bit (good reminder not to give up easily!).
I started to look at different angles, and specifically how I could use the silhouette, rather than battle with hiding it. Moving off to about a 45 degree angle, and quite a tight framing to just a handful or droplets allowed me to get a nice sharp refracted silhouette while positioning the large silhouette in the frame along with the droplets. One other thing than changed moving to this angle was the focal point of the refracted silhouette and the droplets meeting the surface started to align, which meant I had the nice, crisp droplets I was looking for. So now I had some of the technical elements in place, I could start working on the composition. Another plus for making the surface hydrophobic is you can push droplets around more easily and without them separating into smaller ones. Moving the droplets round and adjusting the angle of the cutout I could find some balance in the composition, with the final piece being adjusting the position of the whole lighting setup relative to the drops, allowing some of the dark, unlit background to enter the frame. This I felt provided the then missing visual weight to balance the frame, and additionally providing a nice framing of the droplets, helping keep the eye from wandering out the (then) bright top left corner. This all combined to give something that gave a feeling of opposition, like yin yang, both in the light/dark aspects of the image, but also the wet/dry aspects of water and umbrella.
Lastly, back to a more technical focus, as I know people do like to know some of these things, especially when starting out, here is the breakdown.
Hardware;
- Camera XT-4
- Lens Samyang 100mm Macro
- Flash Godox AD300 pro
- Trigger Godox X1T-F
- Circular polarizer
Settings;
- ISO 160
- F16
- Exposure 1/160
- I can’t remember flash power!
Something to bear in mind with this, is that a shot like this can be capture a from a number of technical angles, like extension tubes if you don’t have a macro lens, continuous light if you don’t have a flash etc. If you only had an LED torch, with a long exposure you can get the same end effect (albeit with maybe a bit more control of lighting). So the take home message is that regardless of what you have to hand, shots like this are a great home project. If you do try, please comment below with a link, as I’d love to see what other ideas people have.

One thought on “Raindrops: Behind the shot”